Language of light (evaluations and projects)
Photography is taking and editing photos to create new unique art.
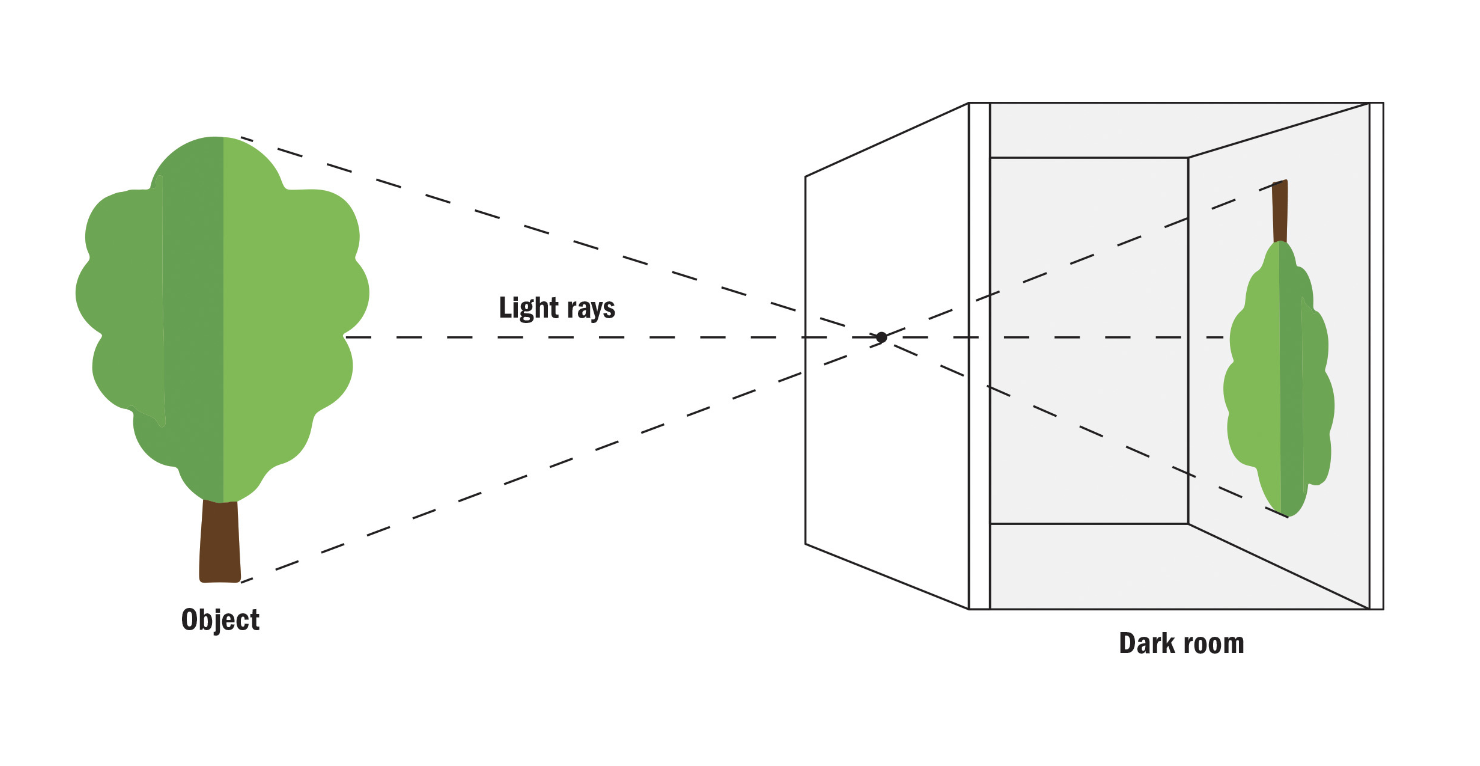
"Camera Obscura" in Latin literally means "dark room".
Ibn al-Haytham created the Camera Obscura.
People would paint over the lines the Camera Obscura created to make it more accurate.
When they added a lense to their pinhole cameras, it would enhance the resolution of the photo.
I used tape, a tiny needle, a small hollow coffee can, a tiny square of tin, and black paint to make my Camera Obscura.
I shared my material and others helped me cut out some of the materials I needed for it.
I found cutting out the small square from my tin can hard, but I found it fun making the flap out of duct tape.
I didn't really see anything when I looked through the viewfinder.
The small speck of light projects the image onto the inside of my Camera Obscura, and the tape/black paint blocks out the light so you can see the image clearly.
Because the light stream crosses over each other and so turns the image upside down.
It can take a very simple camera design to create and warp an image.
Our eyes flip the image in our eyes the wrong way round, but before it gets to your brain it turns it round the right way again.
Camera Obscura (and step-by-step making a pinhole camera)
In class, we made the home made pinhole cameras (or Camera Obscuras) in class out of duct tape, bits of tin, and a tiny pinhole in the side. Here's how.

Here is the template we used to make our Camera Obscura (pinhole cameras). I used an old instant coffee tin to make mine, but any kind of container with a lid can be used. You have to seal off all sources of light except for a tiny pinprick in the side that your image can come through. We cut a little square in our containers and stuck a bit of tin to the inside of the square, shiny side facing outward. We then made a flap to put over it that would seal out any more light, then put a tiny pinhole in the tin so the image would project to the inside of the can.
|
|
|
The videos above explained the science behind the pinhole cameras we made. I like pinhole photography as it mixes art and science together to make interesting, unique, and warped photos.
The Pinhole Camera by Justin Quinnell
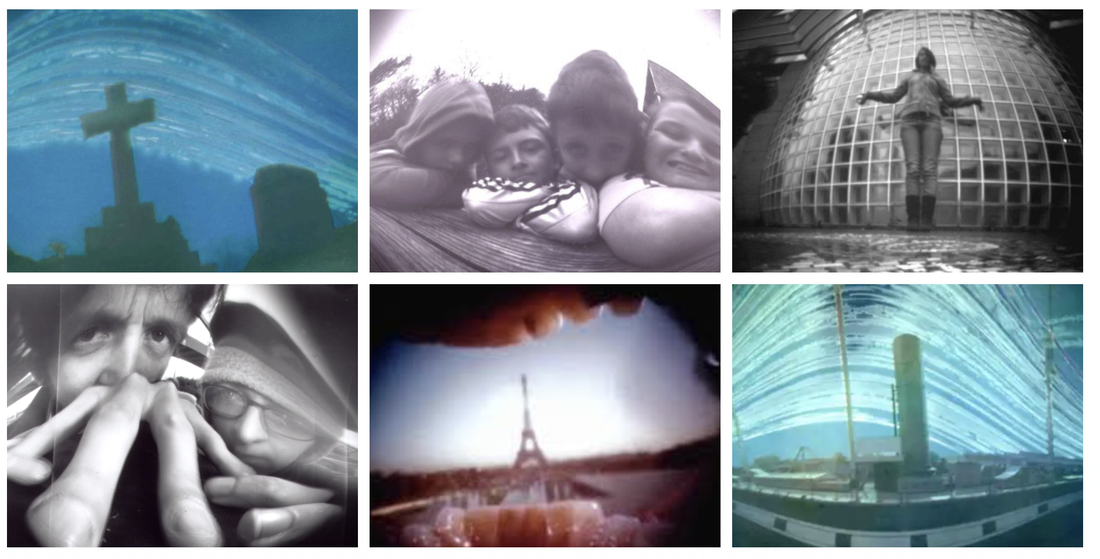
Preliminary Observations: I noticed that all the photos have a sort of arched warp in the middle. It reminded me a bit of fish-eye lenses or the 0.5 features on some of my friends' phones. I really liked the effect as it gives you the power to be artistic, or just to look funny, or both!
Detailed Analysis: The photographs mix the feeling of funny, nostalgic and weird with the angles and colour schemes. It also shows a melancholy or slightly creepy feeling with the top left, with the colours and especially what the picture is actually of.
Detailed Analysis: The photographs mix the feeling of funny, nostalgic and weird with the angles and colour schemes. It also shows a melancholy or slightly creepy feeling with the top left, with the colours and especially what the picture is actually of.


To take and invert these photos, I took my pinhole camera outside and peeled back the shutter so the light could project through the pinhole and onto my paper for about 7 seconds. Then, I went to the dark room and dipped the paper inside of my pinhole camera in the solution for 30 seconds, then hung it up to dry. I left it for a bit, removed it, and these photos were my result.
Abelardo Morell


Abelardo Morell is well known as a photographer known for turning rooms into camera obscura
Antimatter, a project by Vjeko Sager.

I got a sort of cool, sharp edge in my stomach when I saw this. It was a bit odd, but not bad - kind of like I'd swallowed an ice cube. I think it conveyed this feeling because of the minimalistic colours, with the white and grey, and the sharp cutouts of the paper. I think that, as it did for me, and like a lot of modern art/photography, this is supposed to convey a feeling. (although it's not exactly glamorous to look at.) Modern art usually just does this with two or more colours paired together, so I think this one's pretty cool and unique. It's minimalistic, abstract photography that uses a cool colour scheme to convey a feeling. It's meant to represent the "folds" of the brain in an artistic manner - but I didn't get that at all until I read the description, and I still don't really get that feeling, so no, I don't think it's a "truthful" depiction. Vjeko Sager created this piece to show that "if memory can be understood as some sort of matter, then [he] created amnesia, or antimatter".


My interpretation


The photos above are ones I took inspired by project "Antimatter" by Vjeko Sager - I made it by using a scalpel, paper, and a torch. I kind of just improvised while cutting the shapes, thinking "if I cut this way, and folded this way, I think the shadows would look pretty cool." I mixed sharp and soft shapes to make a collage of unique shadows, and used the torch in different angles to make them shorter and/or longer.
Francis Bruguière
Francis Bruguière (1879-1945) was an American photographer who experimented with light, fabric, reflection, destruction, and layering in the early 1900s to the late 1920s.


This is my favourite of the six photos I chose for my study of Bruguière's photography - I liked this one because the bright bursts of white remind me of the explosions in black and white films I've watched, and I think that's really cool, especially as it's not intended to have any coherent shape. The spatters of black appear to be ink strokes, and the grey is grainy and textured, the only parts of the picture that aren't smooth - I like the mix of different methods and textures, even if it's not exactly intentional.
Photographer's interpretation of Bruguière's work


Single image evaluation

Here is my favourite of my 12 photos of a paper sculpture I made in class. I was able to take this by getting a piece of plain paper and scrunching it up to have as much volume as possible, before getting a camera (and a phone light that my friend was holding) for adding the extra striking effect to the picture. The torch and low light of the room help to create a mysterious and visually pleasing effect. The undertones of the purplish grey shadows convey a cool tone and atmosphere.
Francis Brugière inspired photo editing
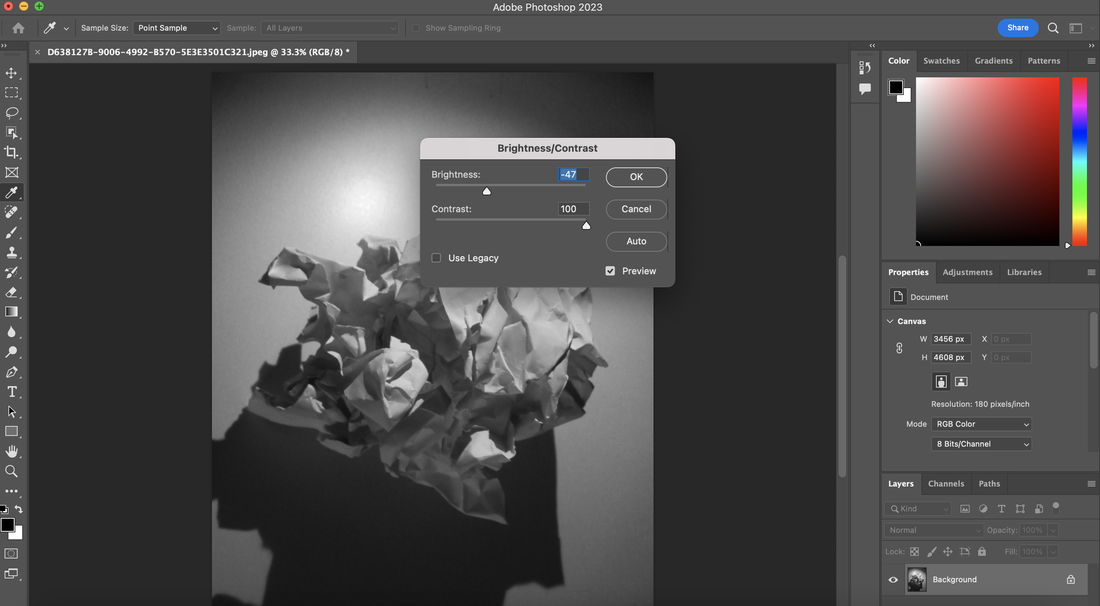
The photo above is a screenshot I took while editing my favourite of the 12 photos I took yesterday of my paper sculpture in PhotoShop. I did this by turning the photograph to black and white before heightening the contrast to make the brighter and darker parts stand out. The finished product is shown on the left. I improved the photo by making it clearer and sharper with the contrast between the blacks, whites, and greys, making it more aesthetically pleasing to look at with the added cinematic flare.
|

|
My photographs of light


Light Photo Video Review
The light painting tutorial explained that you would only need a phone, any kind of light (but probably/preferably a large glow-stick), and a dark setting/environment to make images like these:


The settings needed (if you're using a professional camera) are:
. Manual mode
. Exposure 10-30 secs (if creating more complicated images, longer)
. ISO 100
. f/8 - f/22
. Manual focus
Take a photo with your camera in your dark setting, while tracing whatever images you'd like in the air with your glow-stick. You can use all kinds of different techniques, like wrapping evenly spaced fairy lights around some kind of rod and waving it around to create a streak effect, or spinning a ball of bunched up fairy lights while rotating slowly around a point to create a sphere of light.
My attempt at light painting


Today me and three other classmates worked together to create these images - we split into twos, and two people would operate the camera while the other two played around with modelling and the lights. The images above are all ones that me and my partner created. We played around with different lights, like the last one, where we used a mini torch and a large orange light. The shutter speed was at 10 seconds.
My favourite image evaluation

Here is my favourite image, my partner standing while I drew wings around her and fire engulfing her. This is my favourite image because it's the only one we worked together on that used two lights at the same time. I did this by positioning her, drawing two wings around her, then running in circles around her while bobbing the orange light up and down to create a bright firey effect.
Acetate printing
Today I used an acetate of my negative images I printed out of my paper sculpture to create two test strips of paper. I wrote my name on the back of my paper strips and, in the dark room, put the acetate (shiny side up) over it, then flashed a light for about 2 seconds onto it. I then let my paper strip sit in 4 chemical substances for 30 seconds each before hanging them up to dry and develop, and the results are as shown above.
Photo of My Choice Analysis
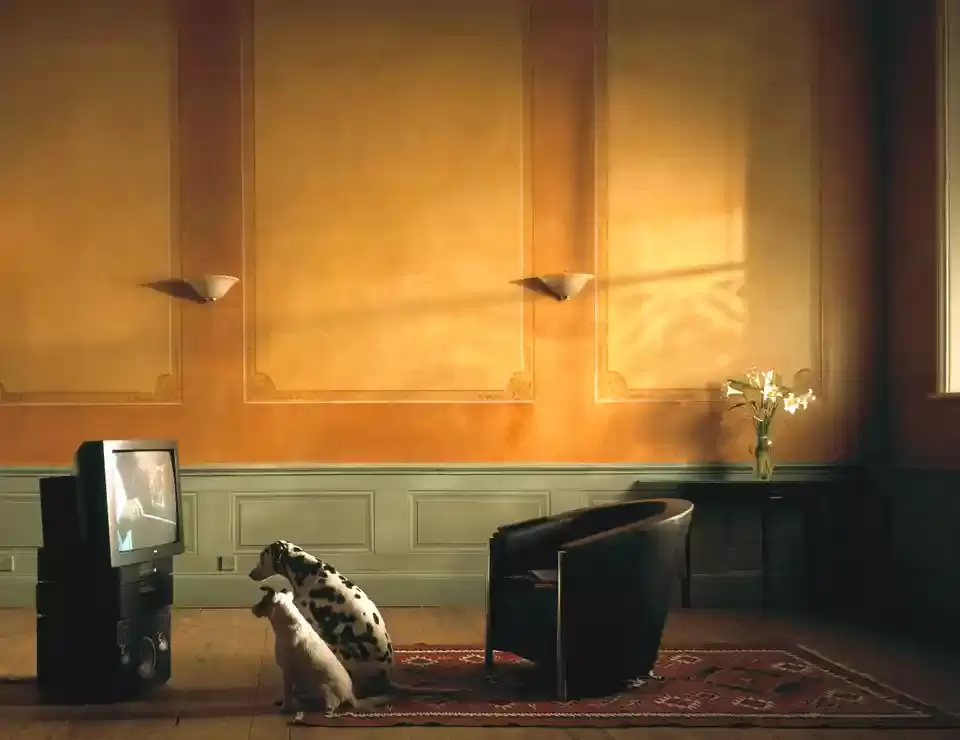
This is a photo I found in a "photography through time" magazine- apparently it was taken sometime from the late 80s to the early 90s. The (artificial) warm light emits from the window, casting patterns on the glass across the wall. I like this photograph as it's funny and whimsical, but also visually appealing and calming. Orange sunlight lights up the edge of the old carpet, reminiscent of ones I've seen in museums (as well as Ikea and my Gran's living room). It feels cozy, lazy, but also bright and nostalgic. It's also familiar to me personally, as it has the same general colour scheme and softness as the cover of Bewitched by Laufey, an album cover familiar to me.
Harry Gruyaert Photos And Features Of His Work
Harry Gruyaert is a photographer from Belgium. He specialises in themes conveying feelings of melancholiness, poetry, and humanity.
. How he uses light is interesting - brighter colours in his work are deeply saturated, but naturally duller colours have an almost grey tint, creating a unique visual contrast.
. Gruyaert's favourite subject seems to be people. His work fluctuates between close ups of people's faces or far away shots from behind.
. A few of his photos are in black and white, but most of his photos have their colour edited to be saturated or desaturated.
. Gruyaert's favourite subject seems to be people. His work fluctuates between close ups of people's faces or far away shots from behind.
. A few of his photos are in black and white, but most of his photos have their colour edited to be saturated or desaturated.


As soon as I went onto Gruyaert's website, this photograph immediately stood out to me. It feels weird, unsettling, and creepy. The blurry, bright-coloured quality reminds me of chunky tv screens from the 90s and early 2000s (or CCTV). The purple and black fuzzy colours convey a theme of mystery - It feels mildly unsettling, but also intriguing. For me, this kind of camera quality always makes me feels unsettled, as if whatever is the subject of the photo is lost or forgotten. The girl's expression is shocked (maybe even scared?), but we don't know what she's reacting to, leaving the viewer confused and curious for more information. I think Gruyaert has taken this photograph by taking a close-up of an old tv screen, or at least, some sort of screen.
My photos responding to Harry Gruyaert
For these photos, I walked around school and used some of my friends as models to capture their simple human moments with my camera- like them laughing, chatting, looking around, running, sitting, or making poses together. I was inspired by Gruyaert's themes of comforting mundane life - I think it helped not to take it too seriously, because you can almost feel the teenage girl-ness oozing out of these photos from how natural and light hearted they are. Some of them I even took as my friends were chatting and walking in front of me.
I also walked around alone for a while and captured my own theme, personal to me, of empty spaces where people usually art. Like stairs, a concourse, paths, benches. This created the sense of loss of familiarity, which has always been fascinating to me, and I'd like to keep this theme in future work.
I also walked around alone for a while and captured my own theme, personal to me, of empty spaces where people usually art. Like stairs, a concourse, paths, benches. This created the sense of loss of familiarity, which has always been fascinating to me, and I'd like to keep this theme in future work.


I think next time I would want to try more funny angles (like the one of the shoes on the stairs) or close ups of people, then editing the lighting, filter, or colours to be similar by Gruyaert's work. I like the fuzzy saturated TV effect that he uses in a few of his pictures, so I'd try to find ways to incorporate that into my editing.
My final project process


For my mock final project, my goal is to create a layered photogram collage with my cut-out images, and possibly draw over the result with white pen. The photos above are the cut-out silhouettes that I will put (one at a time)on sun-sensitive paper. For the most effect, I could
